Using native APIs with PWAs
The undocumented truth. PWAs have a few disadvantages over native applications. A lot of these disadvantages can be removed if we manage to call native android code within our app.
PWA — How do I access Native APIs
Let’s set some goals
This article will examine the viability of using native android code within our PWA. This will be done by attempting the following exercises:
- Trigger a DOM change within angular from a native android button in Android.
- Trigger an Android toast from Angular
Why?
After examining Nativescript and React-Native, it feels like using PWAs within WebViews for bridging the gap between native and web is a well-guarded secret. Should this be a success, the following advantages come to mind:
🍪 PWAs could still be coded using conventional HTML and CSS. This makes it a much stronger contender, as all the npm libraries for angular would still be fully compatible. Nativescript and React Native use their own template engines which makes sharing your codebase difficult.
🍪 Using PWAs would significantly reduce the learning gap when compared to Nativescript and react-native. Instead of learning a new architecture, you only need to learn the specific Android code to be implemented. You can also use native android libraries much easier.
🍪 One codebase to rule them all — Developing code for Android and Web simultaneously could reduce development costs. Issues and bugfixes would not need to be issued for both platforms separately.
PWAs are already quite capable today (check this or the latest information: https://whatwebcando.today/ ) however, bridging the gap could still be useful on occasion.
Why not?
Nativescript and react-native combine IOS and Android into one codebase while sacrificing DOM-effecting library support. It is possible to use WKWebView within IOS to still call your functions, however, this article will focus on Android integration.
The How — Calling Android APIs from Angular
Make sure you have the latest version of Android Studio. You’ll also need to follow our guide on creating PWAs for a working template.
Hint: if you get stuck, check out the complete repository example from here: https://github.com/gabrielstellini/Android-Angular-Data-Binding-demo
Step 1 : Download a project with a simple Android Activity and Webview. We used https://github.com/gabrielstellini/webview
Step 2 : Find your machine’s IP address. This can be done with tools like host hostname`` on Unix and ipconfig on windows. Once you find your IP, replace the following in the Webview activity:
// mWebView.loadUrl("https://example.com");

Becomes:

mWebView.loadUrl("http://192.168.2.123:4200");
In the above example, 192.168.2.123 is the IP of my local machine. This will need to be replaced on your production deployment, but it’s necessary for local development
Step 3 : For local development, you’ll also need to add the following line in your AndroidManifest’s application tag (this will allow HTTP traffic in your Webview):
...
<application

android:usesCleartextTraffic="true"
...
Now run your App! You should be able to see your site 🎉
Step 4 : Enable Javascript by adding the following code below your loadUrl:
WebSettings settings = mWebView.getSettings();
settings.setJavaScriptEnabled(true);
Step 5 : Add the following class:
import android.content.Context;
import android.webkit.JavascriptInterface;
import android.widget.Toast;

public class WebAppInterface {
    Context mContext;

    / **Instantiate the interface and set the context */
    WebAppInterface(Context c) {
        mContext = c;
    }

    /**  Show a toast from the web page */
    @JavascriptInterface
    public void showToast(String toast) {
        Toast.makeText(mContext, toast, Toast.LENGTH_SHORT).show();
The @JavascriptInterface annotation marks methods as public and accessible within javascript
Step 6: Bind your WebView to your new class. Add this below the javascript configuration from step 4:
mWebView.addJavascriptInterface(new WebAppInterface(this), "Android");That should expose your Android interface from JavaScript! Let’s jump into our Angular app!
Step 7 : Go to your app.component.html and add the following button to your template:
<button (click)="showAndroidToast()">SHOW TOAST</button>Step 8: In your ts file, add the following import and function:
declare const Android;

...

export class AppComponent {
  showAndroidToast() {
    Android.showToast("toast");
  }

}
Rerun your android app. You should see a button that will show a toast notification on being pressed! 🎉
The How — Calling Angular functions from Android
You can call javascript functions from android by using the following syntax:
this.mWebView.loadUrl("javascript:functionName(params)");However, this attempts to call the function from a global level.
Technical debt can become an issue fast when you start adding multiple events and using events in many places within the app. For this reason, we can create a new service to handle android triggers like so:
import {   Injectable } from '@angular/core';

@Injectable({
  providedIn: 'root'
})
export class AndroidMessagingService {
  private listeners: MessageListener[] = [];

  constructor() {
    //listen for window message
    window.addEventListener('message', (event: CustomEvent) => {
      this.handleWindowMessage(event.detail);
    });
  }

  handleWindowMessage(eventPayload: eventPayload) {
    if (eventPayload) {
      this.listeners.forEach(listener => {
        listener.onMessage(eventPayload)
      })
    }
  }

  addListener(messageListener: MessageListener) {
    this.listeners.push(messageListener);
  }
}

export interface MessageListener {
  onMessage(messageEvent: eventPayload)
}

export class eventPayload {
  eventType: string;
  payload: any;
}
The events can be fired from the index.html like so:
<script>
  function onAndroidMessage(eventType, payload){
     window.dispatchEvent(new CustomEvent('message', {detail: {eventType, payload}}));
  }
</script>
The event firing can then be updated in the Android project to:
this.mWebView.loadUrl("javascript: onAndroidMessage('testEvent', 'Pressed successfully') ");With this architecture in place, we can use the service in our component:
export class AppComponent  implements MessageListener {
  buttonStatus = 'Unpressed';

  constructor(private androidMessagingService: AndroidMessagingService) {
    this.androidMessagingService.addListener(this)
  }


  onMessage(messageEvent: eventPayload) {
    if(messageEvent.eventType === 'testEvent') {
      this.buttonStatus = messageEvent.payload;
    }
  }
}
The full changes can be viewed in this commit .
Debugging and fixing issues
To enable debugging, of your angular app within your Webview, you need to do the following:
- Enable developer options
- Add this to the activity:
WebView.setWebContentsDebuggingEnabled(true);Navigate to the following URL and inspect your device. You should only see your Webview content on it
chrome://inspect/#devices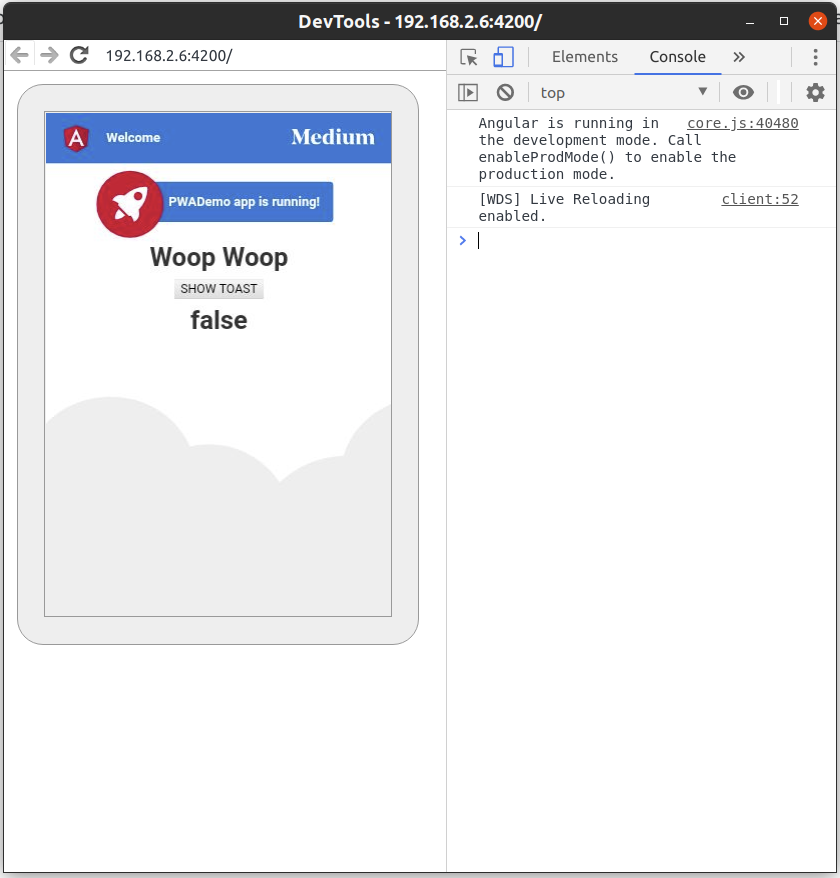
Debugging the Angular code within Webview
Handling hot reloading and page refresh
To open links within the same app and handle page navigation, you’ll need to update your URL handling. For this, update the contents of the “MyWebViewClient” class to the following:
class MyWebViewClient extends WebViewClient {
    @Override
    public boolean shouldOverrideUrlLoading(WebView view, String url) {
        view.loadUrl(url);
        return true;
    }
}
Closing thoughts
Now that you’ve got the app working as intended, be sure to point your app towards the correct production URL and re-review steps 2 and 3. It is also important to note that TWAs are more secure due to the referring web manifest verification. Page navigation might also need to be told explicitly to open in another app that handles URLs — for more details, you can check out the Handling Page Navigation section of the android development documentation.
Tags

Gabriel Stellini
15th May 2020