Deploy your Angular app to the Google Play Store
Building trusted web activities (TWA)
What is a TWA?
A trusted web activity (TWA) is essentially a web app that you can install from the play store. As Google describes it: “a new way to open your web-app content … from your Android app using a protocol based on Custom tabs”.
Before we begin
To deploy your app to the Play Store, your app needs to be a PWA. We have a handy article on how to achieve this here . You’ll also need the latest version of Android Studio and a crisp 25$ bill for Google’s registration/publishing fee.
What are the advantages?
- Faster/smaller footprint when compared to a native app — as we explored previously with PWAs, TWAs are typically faster than native apps with a smaller storage footprint to boot. This is especially important when developing apps for less developed markets
- The “SEO” argument : The Google Play Store does not normally index websites — by adding your app there, you can tap into a different audience altogether
- The security argument : You can make sure that by having an early app presence, your app is more popular than potential unofficial versions (first to market). There are also checks in place to make sure that the TWA and the web app are coming from the same developer, which adds a layer of security to the app — this makes content within the TWA trusted.
- One codebase to rule them all — Fixes and changes to your web app are automatically applied to your app from your web app. Gone are the days where you need to redeploy, and Play Store updates are no longer necessary. You can always be sure your clients are on the latest version of your app 🍰
Limitations
TWAs have the same limitations as PWAs — they have Limited native API support. However, it should be noted that this limitation can be circumvented by following our guide here .
Angular PWA to Google Play Store - Let's kick things off
Step 1:
You’ll need to create an app listing on the Google Play Store:
https://play.google.com/apps/publish/
Once you’ve created the app, you need to go to your google play console and fill in all the required details. Once you fill in the details on a category, the grey checkmarks on the left panel should become green. Please note that since we don’t have an APK file just yet, you won’t be able to fill in the app releases section — we’ll generate an APK in the next steps.
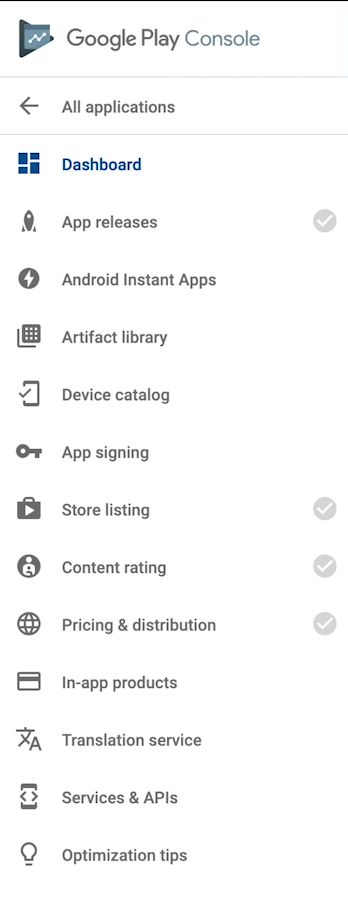
Google play console app configurations
Step 2:
Take note of your SHA-256 certificate fingerprint from under the “App signing” section. Then, in your PWA app create a folder called “.well-known” with an assetlinks.json subfile.
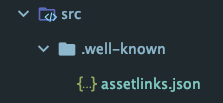
New folder directory
The assetlinks should have the following content:
[
  {
    "relation": ["delegate_permission/common.handle_all_urls"],
    "target": {
      "namespace": "allfront",
      "package_name": "com.example.app",
      "sha256_cert_fingerprints": [
        "YOUR_FINGERPRINT_FROM_STEP_2"
      ]
    }
  }
]
The namespace and package_name can be whatever you wish, as long as you keep a note of them for later steps.
Step 3:
Modify the angular.json to serve the new assetlink file:
"architect": {
  "build": {
    "options": {
      "assets": [
        "src/favicon.ico",
        "src/assets",
        "src/manifest.webmanifest",
         **"src/.well-known/assetlinks.json",**
        "src/robots.txt"
      ],
      ...
Step 4
Clone the TWA Github repo to get the boilerplate code needed for your TWA on https://github.com/GoogleChromeLabs/svgomg-twa
After downloading, open the project in Android studio.
Step 5
Update all the assets to match your PWA icons.
There are 2 ways you can update all your image assets. You can either replace all the icons under the following directories manually (Please be sure to keep the same resolution as the original files if you go this route):
src/main/res/drawable-hdpi
src/main/res/drawable-mdpi
src/main/res/drawable-xhdpi
src/main/res/drawable-xxhdpi
src/main/res/drawable-xxxhdpi
src/main/res/mipmap-anydpi-v26
src/main/res/mipmap-hdpi
src/main/res/mipmap-mdpi
src/main/res/mipmap-xhdpi
src/main/res/mipmap-xxhdpi
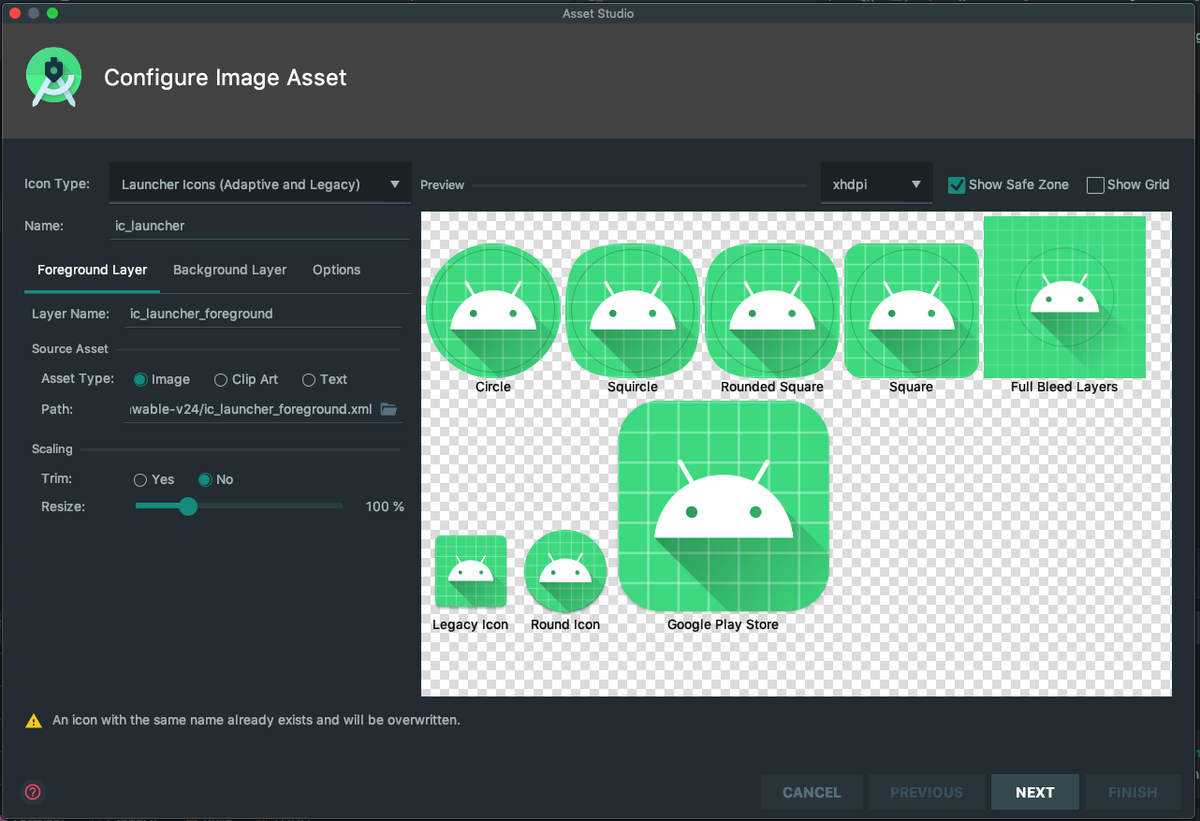
src/main/res/mipmap-xxxhdpiThe better way to do this is to right-click on the res folder and navigate to new>imageAsset. In this window, you can select a high-resolution app icon, and Android Studio will generate the above assets for you automagically!
In this window, you can also adjust other settings — such as the background image color. Be sure to review these before continuing!
Step 6
Update the build.gradle under:
app/build.gradleThe following details need to be updated:
- the applicationId will need to match the package_name from step 2.
- The hostname is the domain that will be opened in the TWA
- The name is the name shown in the android launcher
Optionally you can change the background color and the theme color to better match your app
Although optional, I also updated the Gradle build tools to the latest 3.5.3 in the following directory:
svgomg-twa/build.gradledependencies { classpath 'com.android.tools.build:gradle:3.5.3'Step 7: Almost there!
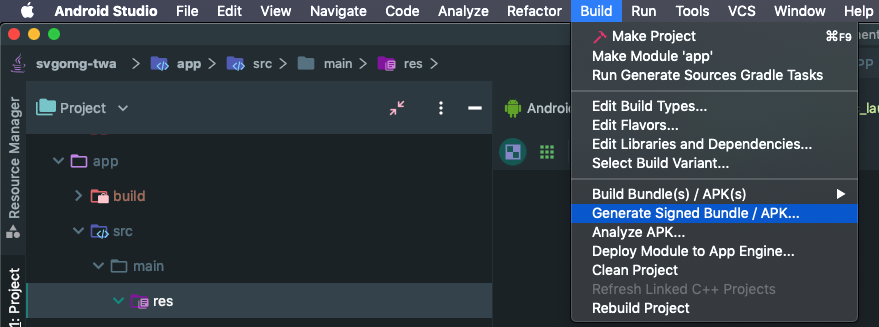
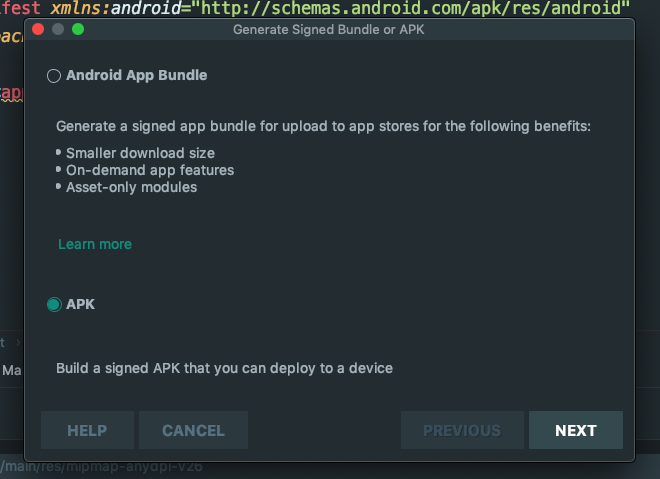
Generate an APK bundle by going to build>generate signed bundle/APK
Select the APK option, then create a new key store path if you don’t have one already,
When you’re done, sign in with your Keystore, and make sure to have both V1 and V2 signature verification jar checkboxes selected

Make sure to check both the checkboxes before clicking finish
Step 8
On your Google Play console, go to app relaeases>manage and create a new release. You can find your APK under app>release>app-release.apk. Upload this to the google play console. Once you have submitted everything, your app should be “pending publication” — wherein you need to wait for Google to review it.
🎉 tada 🎉
Tags

Gabriel Stellini
31st March 2020